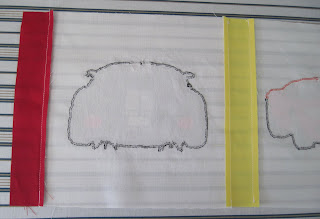
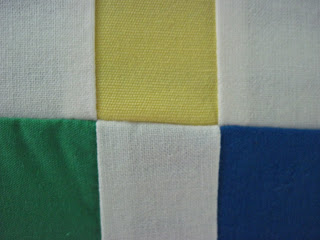
This was quite a day! I started off the morning by changing the settings on the sewing machine for piecing the squares and strips together. I then cut a few strips to mimic the strips I was using for the project, and practiced. I found that using the 1/4" mark was not sufficient. The mark was actually a little bit more than 1/4", and ever after pressing the seam down, I lost about 1/8" on each side due to these factors.

To compensate for this, I played around with the settings, and changed the width from 0 to 4.0. This looked like it would work.

Then I put blue tape down to make it easier to line up the seam, but that proved to be useless - using the edge of the presser foot was sufficient.

I got rid of the tape and decided to start with the blue and green strips, sewing pieces together in rows, and then piecing the rows together. To begin, I sewed a white square to both ends of a green strip.

I then pulled open the pieces and measured the strip. It should have been 8", but was not correct. This meant that I had to cut out 2 more squares and 1 more green strip. I also had to readjust the settings. I changed it from 4.0 to 5.0, and left it on this setting through the remainder of the day.
With the new strips, I tried again. This time, the result was exactly 8", so I felt confident enough to continue.

How to sew the pieces together was new to me. I used a straight stitch. Then I took the two pieces, and laid them on top of each other.

Think of these 2 pieces as 2 pages on the left side of a book. The green and white is the front of the first page. The blue is the back of the 2nd page. Then you sew the 2 pieces together, lining up the right side, so it's 1/4" from where the stitch is.

Once it was sewn, I opened the piece, and there was the seam. I then continued this for all of the blue and green strips going across the quilt in rows (left to right). They looked like they came out the same size, so I was not that worried.

I then sewed the rows with the red and yellow strips.

These had the 12 large white squares.

Each time a piece was sewn together, I put it on the ironing board and ironed the back and front, to flatten the seam.

When I ironed the back, I made sure to rotate the direction that the seams went, so that when it was all pieced together, the seams would all go in different directions, keeping it smooth.

When the rows with the red and yellow strips were complete, I thought they looked great! :-)

There were a few places that the ends did not match up, so I took the rotary cutter and board, and trimmed the edges to make them even.

Once this was done, it was time to sew the rows together. This is where it got interesting. I read somewhere that you should start at the middle of the quilt when you piece, and work your way outward. That is using large squares - not small strips. The more pieces you have to sew, the more problems with lining up you can have. Needless to say, that is exactly what happened here...
I started sewing the rows together. Because the rows were very long, I used pins to hold it together.

This is a picture of 2 rows being sewn together:

When I lined them up on the sewing machine, I paid close attention to the top seams to make sure they were in the correct position, but failed to pay attention to the bottom row's seams. This resulted in seams being sewn together in the wrong direction (see the yellow seam in the picture below). Not a big deal as it's only noticeable on the back of the quilt, but still something I had to correct for the rest of the pieces.

When ironing the seams after sewing multiple rows together, I had to work the corners a bit to get all 4 sides going in different directions like a pinwheel. However, it is definitely worth doing! The seams ironed flat this way with no bulkiness.

The first set of rows looked okay. A couple of the squares did not line up perfectly, but it did not look that bad.

I then put the blue - green - blue strip under this row, and the following row of 3 GTs was supposed to go underneath this row. However, when I flipped the rows together to sew them, I noticed upon opening the seams that I had actually sewn it to the top rather than bottom. No problem! I could just rearrange the order of the cars! But that was only the tip of the iceberg...
Even though the rows appeared to line up well, you can see here how some of them were pretty far off the mark. :-(

This simply would not do! But the problem is that by now, most of the quilt was pieced together!!! From the back, you can see that the middle section (strips and squares) do look pretty lined up (which was quite misleading), and the edges did not line up well at all. There didn't seem to be bunching from any of the stitches, but this was not turning out as planned, and I was starting to feel like hours of work were for nothing.

I did not want to waste another day redoing this, but I could not leave it as it was, so... I thought I would at least try to fix it up a bit! Using a scissors I tried to cut and rip apart the stitches, but I had made this thing childproof, and so it ended up taking about 20 minutes to get one strip opened up.

I obviously did not redo everything, and some of the pieces really could not be fixed as they were the appliqued blocks that were either too short or not lining up right. (This is probably the result of using the scissors rather than rotary cutter).
I used a new technique to get the worst ones to line up. Here's an example of one that was redone:

Even though I made adjustments to how I sewed the pieces together, I still had a few that would not line up because they were too short or too long:

But even though it took a long time, I was able to fix enough of them to have it look decent. I also put the squares back into the correct order. :-) This is what it looked like after all of the pieces were corrected and sewn together. Note that if you double click on the image, it will enlarge it. However, I should warn you that by enlarging it you will see all of the mistakes!! LOL!


Wow! This is fantastic! By the way, you should have bought a seam ripper - then you don't have to try to use a scissors. They are only about $2 and are one of the most useful things I've ever bought when it comes to sewing. Just something to think about for future projects.
ReplyDelete